
FAQ
Blade doesn't lift OR doesn't lower during the cutting process
Issue Description
The blade is not lifting during the cutting process between line segments and so creates a continuous cut line OR the blade is not lowering during the cutting process either immediately (when it is supposed to drop down) or doesn't drop down at all during the cutting process.
Cause
This error may be caused by the following reasons:
The original USB cord (5 ft USB cord) supplied with the Silhouette is not in use
There is not a direct connection between the Silhouette and the computer tower/laptop (i.e. the USB cord is being run through a hub, USB extension cord, through a monitor or keyboard USB port, etc)
There is blue packing tape that has not been removed from the blade housing mechanism
The blade lifting/lowering mechanism is getting stuck during the cutting process
Resolution
Begin by ensuring that the original USB cord is in use. If there is not a direct connection, change the connection of the cord from the USB hub (or other indirect connection) and connect it directly to the computer's tower USB port or laptop USB port.
Once the above has been confirmed, check for the presence of any blue packing tape remaining on the blade carriage. If any such is present, remove it as such can cause concerns with the blade mechanism working properly.
If all above points have been checked, perform the following steps:
- Power off the Silhouette
- Remove the blade from the Silhouette
- Push down the blade holder (as though the blade was being lowered during the cutting process)
- As the blade is being pushed down, spray a small amount of silicone spray (such as WD40) or graphite spray into the exposed portion of the blade holder mechanism which goes up and down
If after walking through all steps and there has been no resolution, pleaes contact support through support@silhouetteamerica.com or call us during our support hours.
CAMEO 3 Firmware bricked
CAMEO 3 Firmware Issue
If concerns are experienced where the CAMEO 3 machine becomes bricked (unusable due to a bad firmware update process), please do the following to reset the process and reinstall the firmware anew:
- Unplug the CAMEO 3 power cord from the machine.
- Hold the power button down on CAMEO 3 and then plug the power cable into CAMEO3 . Continue to hold down the power button until the LCD screen turns light blue.
- Launch the Firmware Update Tool.
- Once you see the window “Please connect the CAMEO and power it on”, press [Ctrl]+[Shift] on your keyboard and then click the [OK] option on the screen as these keyboard buttons are being held down.
Cutting vertical line only (motor not moving side-to-side)
Issue Description
While the cutting mat or material is moved in and out through the Silhouette, motor does not move side-to-side during the cutting action resulting in the Silhouette only cutting a vertical line.
Cause
The following can cause this concern:
- The motor is stuck (generally due to unremoved packing tape)
- The original USB cord (8 ft USB cord) supplied with the Silhouette is not in use
- There is not a direct connection between the Silhouette and the computer tower/laptop (i.e. the USB cord is being run through a hub, USB extention cord, through a monitor or keyboard USB port, etc)
Resolution
The following points may be checked in exploring this concern:
- Lift the Silhouette's lid and remove any blue translucent tape that is connecting the motor to the body of the unit or appearing anywhere on the blade carrier.
- Perform the following steps:
- Power off the Silhouette
- Lift the Silhouette's lid
- Manually push the motor all the way to the left of the machine
- Manually push the motor all the way to the right of the machine
- Power the Silhouette back on
- Ensure that the original USB cord is in use. If there is not a direct connection, change the connection of the cord from the USB hub (or other indirect connection) and connect it directly to the computer's tower USB port or laptop USB port.
How To Use The New Silhouette Cork Sheets
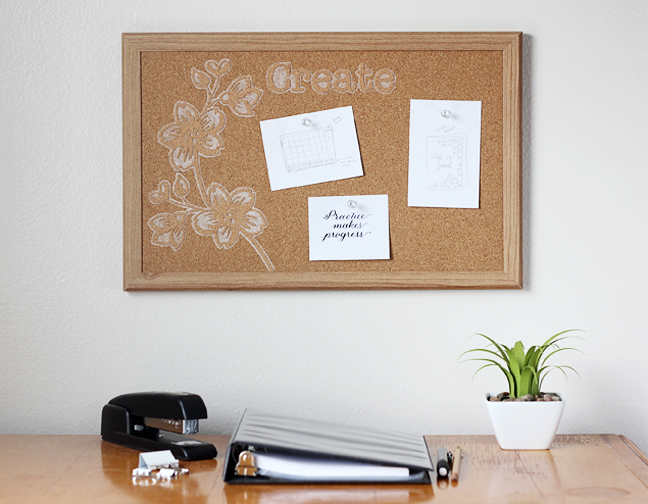
Are you excited about the new products showing up in the Silhouette Shop? I am! Among the first new and unique products I tried are the cork sheets, and I’m here to show you how to use them.
Images are not properly aligned
Issue Description
The image being cut is not lining up properly where the start and end points of the cut line are not matching up, OR the image appears to be skewed and mis-aligned during the cutting process. The mat or material may or may not appear to be drifting during the cutting operation.
One of the following is observed:
The cutting mat (or material if no mat is in use) is drifting/moving off the rollers during the cutting operation
The material is on a cutting mat and appears to be drifting/moving around on the mat (even though the mat itself is securely in place)
The material and cutting mat both appear to be gripped properly but the resulting cut is simply not aligning properly
Cause
The following may cause this concern:
The cutting mat is not in use for a material that should use a cutting mat
The cutting mat or material was not loaded properly and so is not being properly gripped by the pinch rollers
The cutting mat adhesive has worn down and requires replacement
A specialty material is in use that cannot be gripped properly
The blade setting is too high for the material in use and the overexposed blade is getting caught during the cutting process
The blade's opening is obstructed
The cutting mat's edges are curling and getting caught on the motor during the cutting operation
There is a communication issue from the Silhouette Studio® software program
Resolution
Review the following according to the observed cutting action:
The cutting mat (or material if no mat is in use) is drifting/moving off the rollers
- Ensure the cutting mat is being used for materials that do not have their own adhesive backing. If using paper or cardstock (or another material type that does not have a pre-adhered backing), load the material onto the cutting mat. Part of the cutting mat's purpose is to hold the material in place to ensure the resulting cut can be aligned properly.
- Ensure the mat or material is being loaded properly. If the material or cutting mat is not lined up correctly with the intended guide
The material is on a cutting mat and appears to be drifting/moving around on the mat (even though the mat itself is securely in place)
- Check the mat to see if the adhesive has worn down. If the mat has lost its adhesive quality (either overall or in select areas of the mat) and is not holding the material firmly in place during the cutting process, the cutting mat will need to be replaced.
- Check to see if the concern is specific to the material type by testing an alternate material. Some specialty materials (especially those which may be thicker) may experience concerns in how they are being gripped by the rollers. As material thickness increases, the rollers (dependent upon the material type and surface) may not grip as firmly on the media's surface during operation. Click here for further information on resolving this concern.
The material and cutting mat both appear to be gripped properly but the resulting cut is simply not aligning properly
- Ensure the proper loading option is being used to load the material and/or mat.
- Ensure the blade setting is correct for the material type in use. You may want to perform a series of test cuts to find the lowest blade setting possible that still successfully cuts your material type. If the blade is at a higher level than necessary, it is possible that the blade is cutting through the material but getting caught on the mat during the cutting process.
- Ensure the blade is free from any obstruction and swiveling properly.
- Check the edges of the cutting mat. If an older mat is in use where the edges are curling upward, this may catch on the motor as it travels along near the edge of the mat and throw of the cutting alignment. If such is the case, the mat will need to be replaced as the edges become compacted and warped over time.
- Go to the File menu (PC) or the Silhouette Studio menu (Mac) and go to the Preferences option. Go to the Advanced section and adjust the Packet Size setting to "500 bytes". Then click on OK. This will adjust how information is being sent from the computer to the Silhouette and may resolve select concerns that can arise from a potential communication issue.
LCD screen not in English
Issue Description
The LCD screen on the Silhouette is not in English or displayes unfamiliar characters.
Cause
The machine has been inadvertently adjusted to display in Japanese.
Resolution
Silhouette CAMEO®
Select either of the top two options listed on your screen
NOTE: If there is only one option, then you are already on the next screen you will need to get to
Once on the screen with a single option, press the ◄ (left arrow) and ENTER buttons together
When brought to a new series of menus, press the ► (right arrow) button until you come to a menu that shows the word English
Select the English option
Press the ENTER button
Silhouette SD
Use the scrolling arrows on the Silhouette machine until you come to a screen where the first character does not appear like the number "3".
Once you are on this screen, press ENTER
Arrow over until you see English displayed
Once you see English, press the ENTER button
Left-hand roller not lifiting on Silhouette CAMEO®
Issue Description
While the right-hand roller can be released and lifts, the left-hand pinch roller on the Silhouette CAMEO® does not lift up.
Cause
Some newer CAMEO owners may assume that the rollers are intended to be lifted in order to load material, so that you can push materials into place and then lower the bar onto the material.
The left-hand pinch roller is not actually intended to be lifted. Only the right-hand roller is released in order for adjusting the right-hand pinch roller to accept alternate size materials or mats.
Noise issue correspondenc
If the Silhouette is making loud noises and appearing to cut off track, or the motor appears to get stuck during the cutting process and throws off the proper alignment of the cut, this may represent that the motor is off track.
To correct this, you may attempt to manually move the motor to ensure it is on the track properly. To do this, please turn the Silhouette off and manually push the motor all the way to the left of the machine, and then all the way back to the right. It is possible the motor was slightly off track and was therefore making louder noises. After doing this, please turn the machine back on. Once turned on, the motor will travel back into place and should be ready to cut normally as before. You may also seek to put a small bit of oil (such as WD40) or a graphite lubricant on the metal bar that holds the motor of the Silhouette in order to ensure the motor is able to travel back and forth without further concern.
Another concern which may display similar results and cause a noise and misalignment during the cutting process is if you have an older cutting mat where the edges are curling upward and thus catching on the motor as it travels along near the edge of the mat. If such is the case, you may simply need to replace your cutting mat as the edges become compacted and warped over time.
Finally, this issue can also be the result of your blade being overexposed where it is extended too far and catching during the cutting process. If you remove the blade and re-perform the job to have the Silhouette just go through all of the cutting motions without cutting and find that the issue disappears, then this would confirm a blade setting issue. If such is the case, please adjust the blade to a lower setting for your material.
Silhouette starts cutting when powered on (prior to job)
Issue Description
When the Silhouette is powered on, the Silhouette immediately begins to go through cutting motions (starts to cut the same job repeatedly or the blade taps up and down rapidly) prior to any cut job actually being sent.
The issue stops if the USB cord is removed but is repeated without stopping if the unit is powered on and the USB cord is connected to the computer.
Cause
This indicates that there is another USB device (such as a printer) that is trying to communicate with the Silhouette.
Resolution
The following steps may be performed to resolve this concern:
- Power off the Silhouette
- Close the Silhouette Studio© software
- Go to the START menu
- Go to the Control Panel
- Go to the Printers section
- Look for any printer drivers that are grayed out OR printers which are no longer actually owned and are not hooked up to the computer
- Right-click on one of the printer drivers in question and go to the Printer Properties option
- In the window that comes up, go to the Ports tab
- Locate the port type File and check this box
- Click on Apply
- Repeat this action for all applicable printer drivers
This action will direct the older unit's driver which is no longer present to stop it from trying to take up the USB connection and subsequently stop it from confusing the Silhouette machine.
Silhouette unit not powering on
Issue Description
There is no power to the Silhouette unit when attempting to power on the Silhouette.
Cause
The following concerns may cause the Silhouette to not power on properly:
- The power cord is not plugged into a power outlet
- The input that plugs into the Silhouette unit is not firmly connected
- The power cord is plugged into a power strip, but the power strip is not turned on
- The AC adapter is not plugged firmly into the power cord (the connection between the two cord parts)
- There is a concern with the power outlet in use
- The AC adapter and/or power cord has a fault
- The Silhouette unit has an internal fault
Resolution
Please attempt the following in order to troubleshoot and find the source of the concern:
- Check the connections from the Silhouette to the power outlet making sure that the power cord is plugged firmly into the power outlet and that the input that plugs into the Silhouette unit is firmly connected
- If using a power strip, ensure that the power strip is powered on
- Plug in the power cord to an alternate power source in order to ensure the concern is not specific to the outlet in use
- Disconnect the power cord and AC adapter from the Silhouette and then remove the power cord (part with the plug) from the AC adapter (the part with the box that plugs into the Silhouette machine itself), and then plug them back together ensuring they are fully and securely connected
USB files cannot be read on CAMEO touchscreen
Overview
The Silhouette CAMEO model that has a touchscreen can read and use STUDIO3 files as saved from the Silhouette Studio software and saved to a USB device. If files are not showing up properly, the most common concern would be with the STUDIO file version.
Resolution
If your STUDIO3 files are not properly showing up on the CAMEO touchscreen when your USB device is inserted into the machine, please perform the following steps to ensure your files are properly formatted:
- Open Silhouette Studio®
- Go to Edit (PC) or Silhouette Studio menu (Mac)
- Go to Preferences
- Go to Advanced
- Scroll down to the bottom of the panel and check the box labeled “Include Cut Data”
- Click Apply
- Insert the USB drive into your computer
- Navigate to and Open the file located on the USB drive in Silhouette Studio (File > Open OR Open button)
- After the file is open, simply Save the file (File > Save OR Save button)
NOTE: You only need to simply Open the file and then Save it. No adjustment needs to be made or re-naming, no placing it in a new location, etc. - Repeat steps 8 & 9 until all desired files are opened and re-saved
The action of re-saving after you enable the noted Preference option above will ensure the data is included in the file for the CAMEO to read and be able to use going forward. Further, any new files created after this Preference has been adjusted will now be formatted for use in reading a USB file with the CAMEO.
What You Should Know About the Cork Sheets:
Adhesive backed and ready to stick anywhere
Size is 5 in. x 7 in. (eight sheets per package)
Quite thin, so they are more like cork stickers than thick cork board
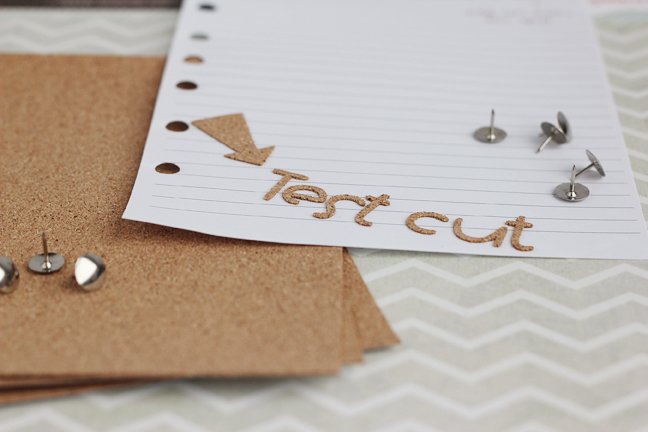
My successful cork settings: Blade 10, Speed 1, Thickness 33, Double Cut
Out of all the options I could think of for using cork stickers, I decided to use them as embellishments on an existing cork bulletin board. It really adds some fun visual interest to an otherwise-boring board (no pun intended).